MLS Search
From PropertyMinder WIKI
(Difference between revisions)
(→New MLS search set-up) |
|||
| (21 intermediate revisions not shown) | |||
| Line 1: | Line 1: | ||
| - | [http:// | + | [[File:Training_Videos.gif|link=http://wiki.propertyminder.com/images/1/1d/Training_Videos.gif]][[MLS Searches Video Tutorial|Video Tutorial]] |
With MLS searches, you can: | With MLS searches, you can: | ||
| - | # [[ | + | # [[#New MLS search set-up|Allow your clients]] to create online search requests on your website. |
| - | # Create a search for your | + | # [[#New MLS search set-up|Create a search for your clien]]t using different filters, criteria and frequency. |
# Receive [[Notifications|email notifications]] and [[Mobile Alert|wireless (mobile) alerts]]. | # Receive [[Notifications|email notifications]] and [[Mobile Alert|wireless (mobile) alerts]]. | ||
# Edit the [[Notifications|New listing found]] notification letter for your clients. | # Edit the [[Notifications|New listing found]] notification letter for your clients. | ||
| Line 12: | Line 12: | ||
# [[Clients search activity|Track/analyze]] your clients search activity. | # [[Clients search activity|Track/analyze]] your clients search activity. | ||
# [[#New MLS search set-up|Manage]] the amount of information to be shown to your client about listings found (hide/show address, map, description, virtual tour, etc.) | # [[#New MLS search set-up|Manage]] the amount of information to be shown to your client about listings found (hide/show address, map, description, virtual tour, etc.) | ||
| - | # | + | # Create and promote [[Custom_IDX_searches|custom IDX searches]]. |
| - | # | + | # View/re-assign/delete [[Ignored Searches]] and assign the auto clean-up of ignored searches. |
| Line 28: | Line 28: | ||
# You can delete unwanted listings from the '''Properties found''' list by checking the delete box. | # You can delete unwanted listings from the '''Properties found''' list by checking the delete box. | ||
# If you are satisfied, click '''Save Search'''. | # If you are satisfied, click '''Save Search'''. | ||
| - | # Select | + | # Select one client or multiple clients from the existing '''Contact list''', or click '''Create new client''' to add a new entry to your CRM. |
# Continue to the next page and name your search. | # Continue to the next page and name your search. | ||
# Select how frequently you want to run this search. We recommend that you choose a high frequency when setting-up searches for "A" buyers and low frequency for less committed buyers. | # Select how frequently you want to run this search. We recommend that you choose a high frequency when setting-up searches for "A" buyers and low frequency for less committed buyers. | ||
| Line 35: | Line 35: | ||
#: [[File:MLS_searches.gif|border|link=http://wiki.propertyminder.com/images/8/84/MLS_searches.gif]] | #: [[File:MLS_searches.gif|border|link=http://wiki.propertyminder.com/images/8/84/MLS_searches.gif]] | ||
# Customize the notification message. | # Customize the notification message. | ||
| - | # Click '''Activate Search'''. | + | # Click '''Activate Search'''. |
| - | + | ||
===Edit the existing search=== | ===Edit the existing search=== | ||
| Line 70: | Line 69: | ||
To completely delete the search, select the '''Trash Can''' icon and you will completely delete the search. | To completely delete the search, select the '''Trash Can''' icon and you will completely delete the search. | ||
| + | |||
| + | [[File:New.png|5pix|link=http://wiki.propertyminder.com/images/1/1a/New.png]] | ||
| + | ===Copy the existing search=== | ||
| + | |||
| + | We added the ability to copy an existing MLS search and assign it to new or different contact(s). | ||
| + | |||
| + | # Go to your Active MLS Searches page. | ||
| + | # Click on '''Copy Search''' link | ||
| + | # Pick the contact(s) that you want to assign the search to. | ||
| + | |||
| + | All the MLS settings & criteria will be carried over to the new contact. | ||
Latest revision as of 04:49, 11 August 2011
With MLS searches, you can:
- Allow your clients to create online search requests on your website.
- Create a search for your client using different filters, criteria and frequency.
- Receive email notifications and wireless (mobile) alerts.
- Edit the New listing found notification letter for your clients.
- Include comparable listings in your search results.
- Notify your clients about listing price changes.
- Track/analyze your clients search activity.
- Manage the amount of information to be shown to your client about listings found (hide/show address, map, description, virtual tour, etc.)
- Create and promote custom IDX searches.
- View/re-assign/delete Ignored Searches and assign the auto clean-up of ignored searches.
Contents |
New MLS search set-up
To set-up a new search:
- Login to your Toolkit and go to MLS Searches.
- Click New Search.
- Select Class and property Status.
- For active searches indicate if you would like to get comparables (subject to the MLS system support).
- Select the area for your search (up to 20 areas are permitted).
- Test the search by clicking Search MLS at the bottom of the page.
- You can delete unwanted listings from the Properties found list by checking the delete box.
- If you are satisfied, click Save Search.
- Select one client or multiple clients from the existing Contact list, or click Create new client to add a new entry to your CRM.
- Continue to the next page and name your search.
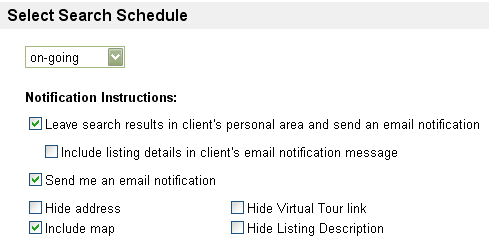
- Select how frequently you want to run this search. We recommend that you choose a high frequency when setting-up searches for "A" buyers and low frequency for less committed buyers.
- Choose if you want the system to send you an email notification and place a copy of the results into your client's personal area.
- Hide/show address, hide/show map, hide/show Virtual Tour link, hide/show listing description.
- Customize the notification message.
- Click Activate Search.
Edit the existing search
- Login to your Toolkit and go to MLS Searches.
- Select Active Searches .
- Select the search and click Edit Search Criteria.
- Edit the search.
- Test the search by clicking Search MLS to view the search results.
- You can delete unwanted listings from the "Properties found" list by checking the delete box.
- If you are satisfied, click Save Search.
Deactivate, reactivate and delete the existing search
You have an option to deactivate the search. When the search is deactivated, the search criteria and search results are saved in the system. The system does not run automated searches until the search is reactivated.
To deactivate the search:
- Login to your Toolkit and select MLS Searches.
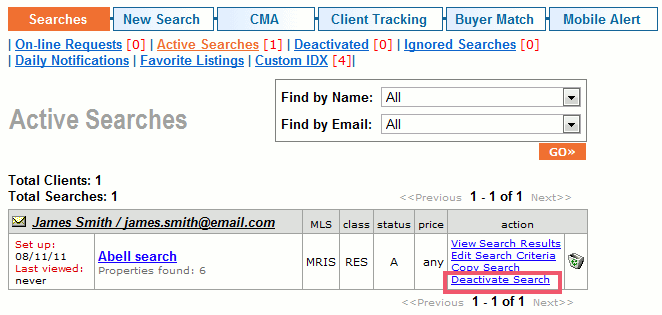
- Select Active Searches to see a list of all current searches.
- Find the Search record that you would like to deactivate. Under the action section, you will see the option to Deactivate Search. You will have the option to Reactivate the search at a later date if necessary.
- To completely delete the search, select the Trash Can icon and you will completely delete the search.
If you would like to reactivate a search:
- Login to your Toolkit and select MLS Searches.
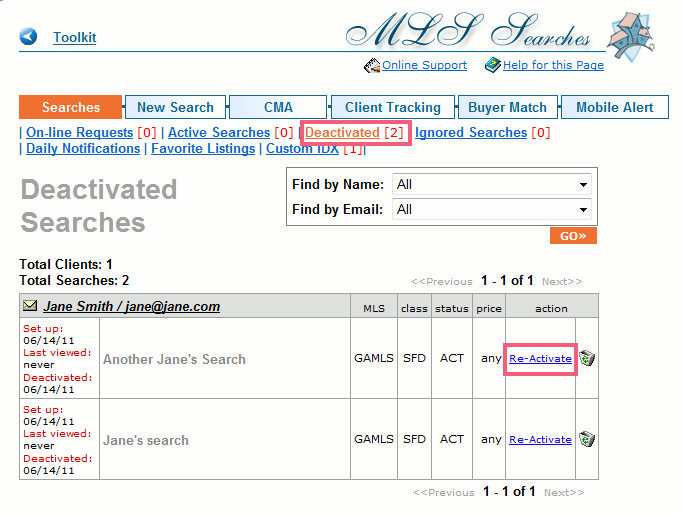
- Select Deactivated to see a list of all current searches.
- Find the Search record that you would like to re-activate. Under the action section, you will see the option to Re-activate Search.
To completely delete the search, select the Trash Can icon and you will completely delete the search.
Copy the existing search
We added the ability to copy an existing MLS search and assign it to new or different contact(s).
- Go to your Active MLS Searches page.
- Click on Copy Search link
- Pick the contact(s) that you want to assign the search to.
All the MLS settings & criteria will be carried over to the new contact.


