Website Editor (framed)
From PropertyMinder WIKI
The website editor page allows you to:
- Upload your own photo.
- Add/edit your slogan.
- Choose/change your website homepage design.
- Choose your banner and images from our gallery or upload your own..
- Add/edit your resume/profile ("About Me").
- Add links from your site to other websites.
- Change the order of links on your website.
- Add/edit your personal custom pages.
- Add/edit your personal lead capture pages.
- Enable, disable or customize the "Auto Lead Capture" window.
- Modify the website Meta Tags.
- Create your own list of utilities.
How to add or change your photo
- Log in to the Toolkit.
- Click Website Editor on the left panel of the Toolkit screen.
- Under the Your Picture section, browse for the photo in your computer and upload it. The page will give you the correct image size.
How to create and edit the "About Me" page
- Login to the Toolkit.
- Click on the Website Editor link on the left side of the screen.
- Click on the About Me icon.
- The About Me feature is a professional editing tool. It allows you to add text, insert images, add links, change font colors, text sizes, background colors, links, and much more. It is fun and easy.
To make formatting changes to the About Me text in the Website Editor:
- Select/highlight the text.
- Click the appropriate icon (bold, italics, font size, background, color, cut and paste) from the top bar of the editor for the desired operation. When you move the pointer over the icon in the toolbar, the action associated with that icon will appear.
- Click the Save button at the bottom of the page to save changes.
How to modify slogan
- Click Website Editor on the left panel of the Toolkit screen.
- Scroll down to Your Slogan section.
- Type in your text.
- Click Save.
How to change the design, style or the color scheme
You can change your website design yourself at any time.
- Log in to the Toolkit.
- Click Website Editor on the left panel of the Toolkit screen.
- In the Website Design section, click the standard designs portfolio or animated designs portfolio link to view the available color schemes. Click any color square to view the designs within that color.
- Make note of the reference number for the design you like.
- In the Standard Designs or Animated Designs drop down box, find and select the reference number and name of the design you like.
- Click the SUBMIT button at the bottom of the page to save changes.
How to add custom pages
You can create and add up to five Custom Pages to your website. A Custom Page is a static page that can be used as an alternative to referring customers to other websites.
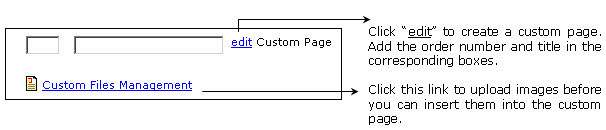
To add a new custom pageNOTE:
- Specify the order/sequence of the custom page link by entering an appropriate number.
 NOTE: The order number is in increments of 10.
- Type in the blank area to label the link associated with the custom page.
- Click the edit link and create a page in the new window that appears.
- After you create the custom page, you can Preview and Save it.
- Click the Submit button at the bottom of the Website Editor page to save changes.
How to add a link to a file saved on my local computer
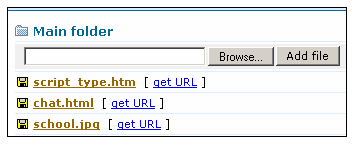
You can upload a non-image file to the custom file manager in the main folder and then add a link/button to the file on your website. To do this:
- Click Website Editor on the left panel of the Toolkit.
- Scroll down and click the Custom Files Management link.
- In the window that appears, in the Main folder section, click the Browse button and choose the location of the file from your local computer.
- After selecting the file, click Add File to add the file to the Custom Files Manager.
- To delete a file, click the trashcan next to the file.
- The file is now saved in Custom Files Management. You can now click the get URL link next to the file name.
- This will bring up a small window with a link to the saved file.
- Copy the link from the window, scroll up to the Your Links section and paste the link into one of the blank fields.
- Enter an order number and a name for the link.
- Go to your website homepage and test the link by clicking the name of the button/link


How to add a custom link
You can add as many links to your website as you like. These links will be shown on your website in the order you specify (ascending order).
To add a new link:
- Specify the order by entering an appropriate number.
- Label the button associated with the custom link.
- Provide the URL/link (http://www.webaddress.com) of the page to be associated with the button.
- Click the SUBMIT button at the bottom of the page to save changes

Auto Lead Capture window
How to customize the Auto Lead Capture window
The lead auto capture window has been designed as a layered screen that slides down onto your homepage when a new visitor comes to your home page. Since the window is not a pop-up but a layer, it does not negatively impact your website with regard to search engines and PPC services like Google Adwords.
- Click the Website Editor button on the left panel of the Toolkit.
- Scroll down to the section "Lead Auto Capture with Auto Respondents".
- To change the background color of the window, choose a Palette color on the right.
- To edit the text message, click in the white message area.
- To see a preview of the customized Auto Lead Capture window, click Preview Lead Auto Capture on the right side.
- Depending on weather you are using PPC advertising or not, you can choose the display options of this auto lead capture for different browsers. Here are the available options:
- Default style (apply user's mail client to get his contact info)
- Capture form style (apply information typed by user)
- Disable Auto Lead Capture
- Right below the promotion box, you can customize the email that will go out to your web visitor.
- To save and update changes, click Submit at the bottom of the page
The Auto Lead capture tool uses cookies. When a client goes to the site the first time and clicks on the Auto Lead capture box, the site will place a cookie on their computer to note that they have logged in before. To re-enable the drop down box, the user will need to delete the cookies from the Internet Explorer cache.
How to modify the welcome message
- Login to your Toolkit.
- Click Website Editor on the left navigation panel.
- Click the 'Edit Welcome Message link.
- Update the message and add hyperlinks, images or change the formatting of the message.
- After modifying the Welcome Message, you can Preview and Save the message.
Meta Tags
A Meta Tag describes some aspects of the contents of a web page. The information that you provide in a Meta Tag is used by search engines to index a page so that someone searching on the Internet for content contained in your website will be able to find it. The Meta Tag is placed near the top of the HTML in a Web page as part of the heading.
- All your most important key phrases should be in the TITLE tag. Look at your key phrases, make a list of all the important words, and create a title tag that uses them. Also, keep in mind that browsers only display the first few words of a title tag. The first sentence of your title tag should be easy to read and understand.
- The Keywords Meta Tag lists the words or phrases that best describe the contents of the web page.
- The Description Meta Tag includes a brief (one or two sentences) description of the page.
- NOTE
- The title, keyword and description tag are used by search engines to index your website page and assign a position based on their relevancy to the search query (keyword).
How to change Meta Tags
Agents, who are comfortable manipulating keywords, site titles, and Meta Tags, can make these changes through the Meta Tag editor. Typically, the document which contains the most keywords searched and relevant to the website content is classified by the search engine as the most popular and will be selected as the "best match".
To change your website Meta Tags:
- Click Website Editor on the left panel of the Toolkit screen.
- Scroll down to the section on Meta Tags for your website.
- Add or update the words in the Title, Description and Keyword fields.