Lead Capturing Forms
From PropertyMinder WIKI
(→Custom Lead Capture Forms) |
|||
| (22 intermediate revisions not shown) | |||
| Line 1: | Line 1: | ||
| - | |||
| - | |||
| - | |||
You AccelerAgent website is packed with the number of pre-designed lead capturing forms like Auto Lead Capture window, CMA, reports for home buyers and home sellers, and many other. But only drop-down window on the home page is customizable. On the other hand have the ability to create your own lead capturing forms on your protected pages. | You AccelerAgent website is packed with the number of pre-designed lead capturing forms like Auto Lead Capture window, CMA, reports for home buyers and home sellers, and many other. But only drop-down window on the home page is customizable. On the other hand have the ability to create your own lead capturing forms on your protected pages. | ||
| + | |||
===Auto Lead Capture window=== | ===Auto Lead Capture window=== | ||
| + | |||
| + | [[File:Training_Videos.gif|link=http://wiki.propertyminder.com/images/1/1d/Training_Videos.gif]][[Auto Lead Capture Video Tutorial|Video Tutorial]] | ||
The lead auto capture window has been designed as a layered screen that slides down onto your homepage when a new visitor comes to your home page. Since the window is not a pop-up but a layer, it does not negatively impact your website with regard to search engines and PPC services like Google Adwords. | The lead auto capture window has been designed as a layered screen that slides down onto your homepage when a new visitor comes to your home page. Since the window is not a pop-up but a layer, it does not negatively impact your website with regard to search engines and PPC services like Google Adwords. | ||
| Line 10: | Line 10: | ||
# Click the '''Website Editor''' button on the left panel of the '''Toolkit'''. | # Click the '''Website Editor''' button on the left panel of the '''Toolkit'''. | ||
# Select the '''Special Promotion''' icon. | # Select the '''Special Promotion''' icon. | ||
| - | #; [[File:Website_editor_special_promotion.gif]] | + | #; [[File:Website_editor_special_promotion.gif|border|300 px|link=http://wiki.propertyminder.com/index.php/File:Website_editor_special_promotion.gif]] |
# Select background color of the window. Choose from predefined colors or click on the Custom color button to select your own tone. | # Select background color of the window. Choose from predefined colors or click on the Custom color button to select your own tone. | ||
# To edit the text message, click on the message area and type over the existing text. Note that you can also change the headline of your promotion box. | # To edit the text message, click on the message area and type over the existing text. Note that you can also change the headline of your promotion box. | ||
| Line 23: | Line 23: | ||
# Click Save changes to finish. | # Click Save changes to finish. | ||
| - | You also have the option to modify the Welcome email message to your potential clients. Refer to the Welcome email message tab to do that. Do not forget to click '''Save''' when you're done | + | You also have the option to modify the Welcome email message to your potential clients. Refer to the Welcome email message tab to do that. Do not forget to click '''Save''' when you're done. |
| - | + | ||
| - | The Auto Lead capture tool uses cookies. When a client goes to the site the first time and clicks on the Auto Lead capture box, the site will place a cookie on their computer to note that they have logged in before. To re-enable the drop down box, the user will need to delete the cookies from the browser's cache. You may [[ | + | : [[File:Website_editor_special_promotion_message.gif|border|300 px|link=http://wiki.propertyminder.com/images/5/5a/Website_editor_special_promotion_message.gif]] |
| + | |||
| + | The Auto Lead capture tool uses cookies. When a client goes to the site the first time and clicks on the Auto Lead capture box, the site will place a cookie on their computer to note that they have logged in before. To re-enable the drop down box, the user will need to delete the cookies from the browser's cache. You may [[Edit Website Troubleshoting|read here]] how to do that. | ||
===Custom Lead Capture Forms=== | ===Custom Lead Capture Forms=== | ||
| - | You have the option to create your own capture forms if you want some information to be | + | [[File:Training_Videos.gif|link=http://wiki.propertyminder.com/images/1/1d/Training_Videos.gif]][[Lead Capture Video Tutorial|Video Tutorial]] |
| + | |||
| + | You have the option to create your own capture forms if you want some information to be available only for registered users. | ||
# Login to the '''Toolkit'''. Click on '''Website Editor''' on the left hand side of the screen. | # Login to the '''Toolkit'''. Click on '''Website Editor''' on the left hand side of the screen. | ||
# Click on the '''Buttons''' icon | # Click on the '''Buttons''' icon | ||
# Click on '''Create Lead Capture Form''' link | # Click on '''Create Lead Capture Form''' link | ||
| - | # Name your custom page. This will be the title of your button on the website. | + | #; [[File:Lead_capture_form00.gif|border|link=http://wiki.propertyminder.com/images/e/e2/Lead_capture_form00.gif]] |
| - | #; [[File: | + | # Name your custom page. This will be the title of your button on the website. Add the text to make the page more attractive. Use the WYSIWYG editor of the page. To change the name of registration fields click '''Bind input fields to contact'''. |
| - | # | + | #; [[File:Lead_capture_form01.gif|border|link=http://wiki.propertyminder.com/images/c/c3/Lead_capture_form01.gif]] |
| - | + | # '''Bind input fields to contact''' will automatically add the people who filled out the form into your CRM. You just need to specify which fields to pull and transfer to your CRM. | |
| - | # You can edit the email that | + | #; [[File:Lead_capture_form02.gif|border|link=http://wiki.propertyminder.com/images/1/11/Lead_capture_form02.gif]] |
| + | # You can edit the email that new contact will receive after filling out your form and you can also customize the thank you page on your website, which is what they see after they fill out the form. | ||
| + | #; [[File:Lead_capture_form03.gif|border|link=http://wiki.propertyminder.com/images/9/90/Lead_capture_form03.gif]] | ||
| + | # Click '''Save'''. | ||
Latest revision as of 03:00, 21 October 2011
You AccelerAgent website is packed with the number of pre-designed lead capturing forms like Auto Lead Capture window, CMA, reports for home buyers and home sellers, and many other. But only drop-down window on the home page is customizable. On the other hand have the ability to create your own lead capturing forms on your protected pages.
Auto Lead Capture window
The lead auto capture window has been designed as a layered screen that slides down onto your homepage when a new visitor comes to your home page. Since the window is not a pop-up but a layer, it does not negatively impact your website with regard to search engines and PPC services like Google Adwords.
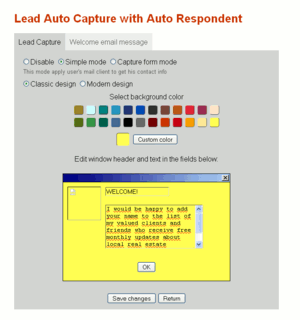
- Click the Website Editor button on the left panel of the Toolkit.
- Select the Special Promotion icon.
- Select background color of the window. Choose from predefined colors or click on the Custom color button to select your own tone.
- To edit the text message, click on the message area and type over the existing text. Note that you can also change the headline of your promotion box.
- You can choose the display options of this auto lead capture. Here are the available options:
- Simple mode (applies user's mail client to get his contact info)
- Capture form mode (applies information typed by user)
- Disable Auto Lead Capture
- Both Simple mode and Capture form mode have two design options:
- Classic design
- Modern design
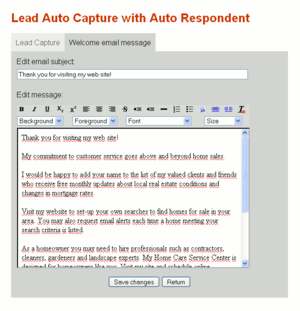
- On the Welcome email message tab, you can customize the email that will go out to your web visitor.
- Click Save changes to finish.
You also have the option to modify the Welcome email message to your potential clients. Refer to the Welcome email message tab to do that. Do not forget to click Save when you're done.
The Auto Lead capture tool uses cookies. When a client goes to the site the first time and clicks on the Auto Lead capture box, the site will place a cookie on their computer to note that they have logged in before. To re-enable the drop down box, the user will need to delete the cookies from the browser's cache. You may read here how to do that.
Custom Lead Capture Forms
You have the option to create your own capture forms if you want some information to be available only for registered users.
- Login to the Toolkit. Click on Website Editor on the left hand side of the screen.
- Click on the Buttons icon
- Click on Create Lead Capture Form link
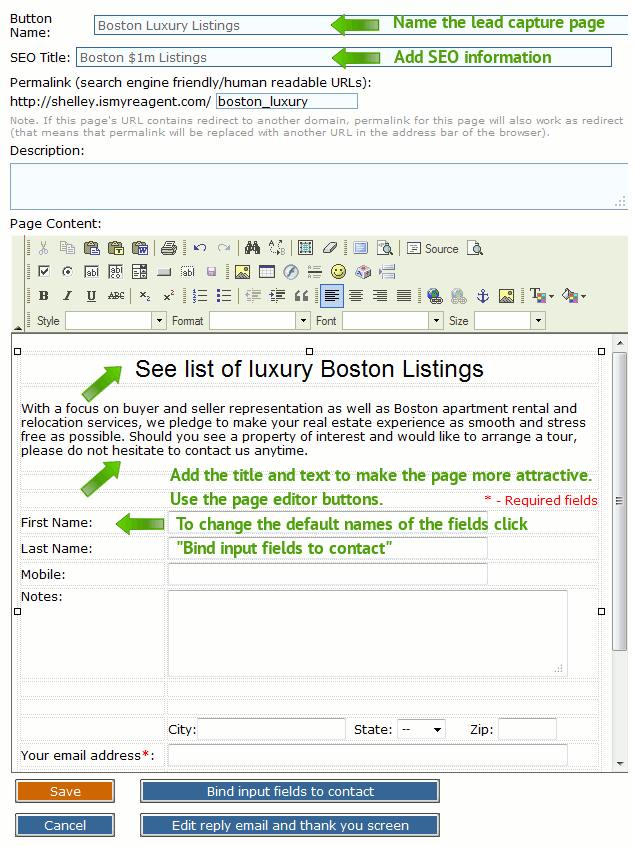
- Name your custom page. This will be the title of your button on the website. Add the text to make the page more attractive. Use the WYSIWYG editor of the page. To change the name of registration fields click Bind input fields to contact.
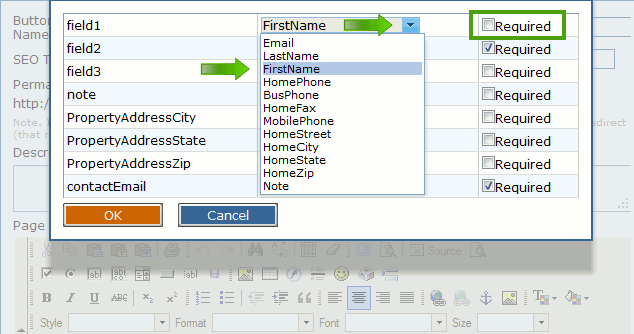
- Bind input fields to contact will automatically add the people who filled out the form into your CRM. You just need to specify which fields to pull and transfer to your CRM.
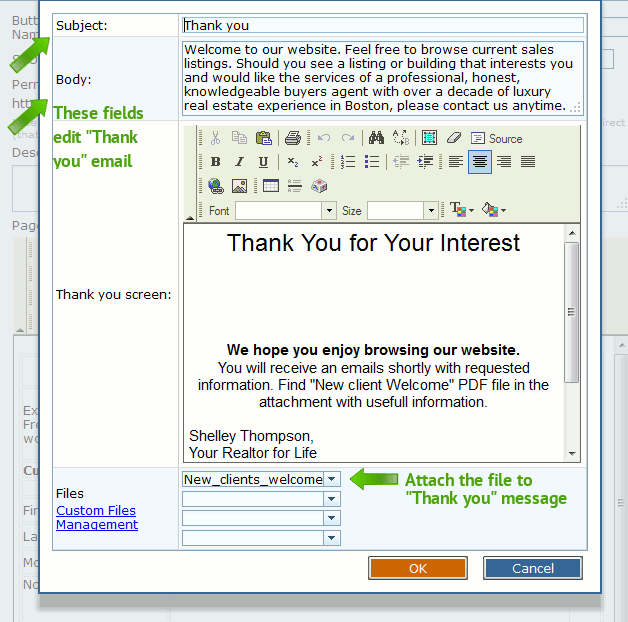
- You can edit the email that new contact will receive after filling out your form and you can also customize the thank you page on your website, which is what they see after they fill out the form.
- Click Save.

