Work with Contacts
From PropertyMinder WIKI
(Created page with "How can I add new contacts to the Contact Manager? You can add new contacts manually, or import them from your Microsoft Outlook email account. To add a contact manually: 1. ...") |
|||
| (23 intermediate revisions not shown) | |||
| Line 1: | Line 1: | ||
| - | + | ===Add new contacts to the Contact Manager=== | |
You can add new contacts manually, or import them from your Microsoft Outlook email account. | You can add new contacts manually, or import them from your Microsoft Outlook email account. | ||
| Line 5: | Line 5: | ||
To add a contact manually: | To add a contact manually: | ||
| - | + | # Go to the '''Client Relationship Management'''. | |
| - | + | # Click the '''New Contact''' button at the top of the page. | |
| - | + | # You can specify which group to put this contact under. | |
| - | + | # Enter the primary and secondary contact information. You can also put confidential notes about the client and then click '''SAVE''' at the bottom of the page. | |
| - | + | ||
| - | + | ||
| - | + | ||
To import contacts from Outlook, or other CRM: | To import contacts from Outlook, or other CRM: | ||
| - | + | [[File:Training_Videos.gif|link=http://wiki.propertyminder.com/images/1/1d/Training_Videos.gif]][[Importing Contacts Video Tutorial|Video Tutorial]] | |
| - | + | # First of all you need to export records from Outlook or any other CRM you use | |
| + | #:: From Microsoft Outlook or Outlook Express, select "Import and Export ..." item from the "File" menu. | ||
| + | #:: From the "Import and Export Wizard" dialog box, select "Export to a file" and click "Next". | ||
| + | #:: Choose "Comma Separated Values(Windows) and click "Next". | ||
| + | #:: Select "Personal Folders", "Contacts" and click "Next". | ||
| + | #:: Type the name of the file where to save your exported records. And click "Next". | ||
| + | #:: Click "Finish" to finish exporting your contact records. | ||
| + | # Provide the name of the file with Outlook contact record export. | ||
| + | #:: Click "Browse" button below and navigate to the file with exported contacts ("c:\contacts.csv"). Highlight the filename and click "Open". | ||
| + | # Import your contacts by clicking "Upload File" button. | ||
| + | # On the next page you will be asked to map PropertyMinder CRM fields with header of your file. Click Next when you matched all fields. | ||
| + | # On the last step you need to specify the group you would like to add new contacts and click Save to finish uploading. If you do not want some contact to be added this time just uncheck them. | ||
| - | |||
| + | ===To delete contact(s)=== | ||
| - | + | # To delete a contact or multiple contacts from your CRM, you must login to your '''Toolkit'''. | |
| + | # Go to '''Client Relationship Management'''. | ||
| + | # Select '''Contact List''' to see a list of all your contacts. | ||
| + | # Search for your contact by name or email address. | ||
| + | #; [[File:Select_search.gif|border|link=http://wiki.propertyminder.com/images/c/ca/Select_search.gif]] | ||
| + | # On the right hand side of each contact you will see a checkbox. Check the box and click the button '''Delete all checked'''. This action will not only delete the contact but also delete all associated searches. | ||
| + | #; [[File:Select_contact_list.gif|border|link=http://wiki.propertyminder.com/images/8/8b/Select_contact_list.gif]] | ||
| + | # For multiple deletion check multiple boxes at one time. You are allowed to delete maximum of 100 contacts. | ||
| - | + | [[File:Ring.gif]] WARNING: Please be attentive while deleting the contacts. | |
| - | |||
| - | + | ===To export contacts to Outlook or other CRM?=== | |
| - | + | Most industry standard email, PDA or CRM software is capable of reading and loading data exported and stored in comma separated formatted files. You can export contacts from every contact group of your CRM. | |
| - | + | ||
| - | + | ||
| - | + | ||
| - | + | ||
| - | + | ||
| - | + | ||
| - | + | ||
| - | + | ||
| - | + | ||
| - | + | ||
| - | + | ||
| - | + | ||
| - | + | ||
| - | + | ||
| - | + | ||
| - | + | ||
| - | + | ||
| - | + | ||
| - | + | ||
| - | + | ||
| - | + | ||
| - | + | ||
| - | + | ||
| - | + | ||
| - | + | ||
| - | + | ||
| - | + | ||
| - | Most industry standard email, PDA or CRM software is capable of reading and loading data exported and stored in comma separated formatted files. You can export contacts from every contact group of | + | |
To do this: | To do this: | ||
| - | + | # Go to '''Client Relationship Management'''. | |
| - | + | # Click the '''Contacts''' button. | |
| - | + | # Click on the contact group you would like to export (example: Buyers). | |
| - | + | # Click the link '''Export contacts''' and save the file on your computer. | |
| - | + | ||
| - | + | ||
| - | + | ||
| - | + | ||
| - | + | ||
| - | + | ||
| - | + | ||
| - | + | ||
| - | + | ||
| - | + | ||
| - | + | ||
| - | + | ||
| - | + | ||
| - | + | ||
| - | + | ||
| - | + | ||
| - | + | ||
| - | + | ||
| - | + | ||
| - | + | ||
| - | + | ||
| - | + | ||
| - | + | ||
| - | + | ||
| - | + | ||
| - | + | ||
| - | + | ||
| - | + | ||
| - | + | ||
| - | + | ||
| - | + | ||
| - | + | ||
| - | + | [[File:Crm_export.jpg|border|link=http://wiki.propertyminder.com/images/2/22/Crm_export.jpg]] | |
| - | |||
| - | |||
| - | + | ===Your Client's Personal Area=== | |
| - | + | When a new visitor is registered on your website, a client area is created by default. | |
| + | The user can save searches, view search results, check transaction report or comparable analysis (if available), save favorite listings from the client area. | ||
| - | + | [[File:Cc.jpg|border|300 px|link=http://wiki.propertyminder.com/images/4/4d/Cc.jpg]] | |
| - | + | To see your clients' favorites: | |
| - | + | # Login to your '''Toolkit''' and go to '''MLS Searches'''. | |
| + | # Click the '''Favorite Listings''' link. | ||
| - | + | [[File:Favirities.jpg|border|link=http://wiki.propertyminder.com/images/f/f6/Favirities.jpg]] | |
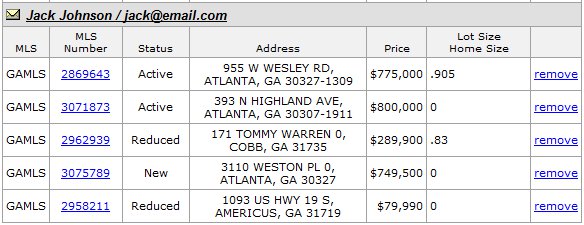
| - | + | You have the option to delete client's favorite listings. | |
| - | + | [[File:Favirities1.jpg|border|link=http://wiki.propertyminder.com/images/9/9d/Favirities1.jpg]] | |
Latest revision as of 05:16, 23 June 2011
Contents |
Add new contacts to the Contact Manager
You can add new contacts manually, or import them from your Microsoft Outlook email account.
To add a contact manually:
- Go to the Client Relationship Management.
- Click the New Contact button at the top of the page.
- You can specify which group to put this contact under.
- Enter the primary and secondary contact information. You can also put confidential notes about the client and then click SAVE at the bottom of the page.
To import contacts from Outlook, or other CRM:

- First of all you need to export records from Outlook or any other CRM you use
- From Microsoft Outlook or Outlook Express, select "Import and Export ..." item from the "File" menu.
- From the "Import and Export Wizard" dialog box, select "Export to a file" and click "Next".
- Choose "Comma Separated Values(Windows) and click "Next".
- Select "Personal Folders", "Contacts" and click "Next".
- Type the name of the file where to save your exported records. And click "Next".
- Click "Finish" to finish exporting your contact records.
- Provide the name of the file with Outlook contact record export.
- Click "Browse" button below and navigate to the file with exported contacts ("c:\contacts.csv"). Highlight the filename and click "Open".
- Import your contacts by clicking "Upload File" button.
- On the next page you will be asked to map PropertyMinder CRM fields with header of your file. Click Next when you matched all fields.
- On the last step you need to specify the group you would like to add new contacts and click Save to finish uploading. If you do not want some contact to be added this time just uncheck them.
To delete contact(s)
- To delete a contact or multiple contacts from your CRM, you must login to your Toolkit.
- Go to Client Relationship Management.
- Select Contact List to see a list of all your contacts.
- Search for your contact by name or email address.
-
- On the right hand side of each contact you will see a checkbox. Check the box and click the button Delete all checked. This action will not only delete the contact but also delete all associated searches.
-
- For multiple deletion check multiple boxes at one time. You are allowed to delete maximum of 100 contacts.
![]() WARNING: Please be attentive while deleting the contacts.
WARNING: Please be attentive while deleting the contacts.
To export contacts to Outlook or other CRM?
Most industry standard email, PDA or CRM software is capable of reading and loading data exported and stored in comma separated formatted files. You can export contacts from every contact group of your CRM.
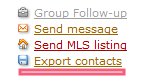
To do this:
- Go to Client Relationship Management.
- Click the Contacts button.
- Click on the contact group you would like to export (example: Buyers).
- Click the link Export contacts and save the file on your computer.
Your Client's Personal Area
When a new visitor is registered on your website, a client area is created by default.
The user can save searches, view search results, check transaction report or comparable analysis (if available), save favorite listings from the client area.

To see your clients' favorites:
- Login to your Toolkit and go to MLS Searches.
- Click the Favorite Listings link.

You have the option to delete client's favorite listings.