How do I add a new listing manually
From PropertyMinder WIKI
(Difference between revisions)
Anastasia (Talk | contribs)
(Created page with "To '''manually add listing''' to your website you need to: # Login to your '''Toolkit''' and go to '''Inventory Manager'''. #:[[File:Inventory_manager.gif|border|link=http://wiki...")
(Created page with "To '''manually add listing''' to your website you need to: # Login to your '''Toolkit''' and go to '''Inventory Manager'''. #:[[File:Inventory_manager.gif|border|link=http://wiki...")
Latest revision as of 04:33, 20 June 2011
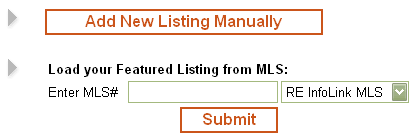
To manually add listing to your website you need to:
- Login to your Toolkit and go to Inventory Manager.
- Click on the Add New Listing Manually button.
- Add a Photo to a Listing/Property. You may read here how to prepare your photos for publication on the web.
- Click on the Browse button to locate the image on your computer.
- Locate the file/directory.
- Double click on the file you want to use. If you can't see your file above, try changing the Files of type: to All Files (*.*).
- Click on the Upload Photo button.
- Add more photos.
- Add Virtual Tour Link to a Listing/Property. Name the link and paste the web address (URL).
- You can add the custom link that will show Disclosers, specific area reports or anything you want. Name the link and put web address (URL).
- Add General Information (the required fields are marked in red).
- Type an attention grabbing description for the property in the Description field.
- Add Property Features. You may check as many features as you want.
- Click on the Submit button to add the new Listing/Property to your personal website.