Disclosure Documents
From PropertyMinder WIKI
(Difference between revisions)
| (One intermediate revision not shown) | |||
| Line 1: | Line 1: | ||
| - | [[File:Training_Videos.gif|link=http://wiki.propertyminder.com/images/1/1d/Training_Videos.gif]][[ | + | [[File:Training_Videos.gif|link=http://wiki.propertyminder.com/images/1/1d/Training_Videos.gif]][[Disclosures_Video_Tutorial|Video Tutorial]] |
| Line 37: | Line 37: | ||
# Look for your listing. Click on '''Disclosures''' link under the Action column. | # Look for your listing. Click on '''Disclosures''' link under the Action column. | ||
# Click on '''Download Logs''' link to see who downloaded your documents. | # Click on '''Download Logs''' link to see who downloaded your documents. | ||
| - | |||
| - | |||
| - | |||
| - | |||
Latest revision as of 04:51, 23 June 2011
Disclosure package are the documents such as existing contracts, government forms, various inspection reports, lists of exceptions (e.g. lack of permit, violations, etc.) and more that pertains to the property for sale. They are mostly in pdf formats when hosted online as they are considered as protected documents. The listing agent has the authority to permit access to an individual.
Contents |
To add disclosure documents to the listing
- Login to your Toolkit.
- Click Inventory Manager.
- Find the listing and click on the disclosures link under the Action column.
- On the next page, click Browse and upload your document.
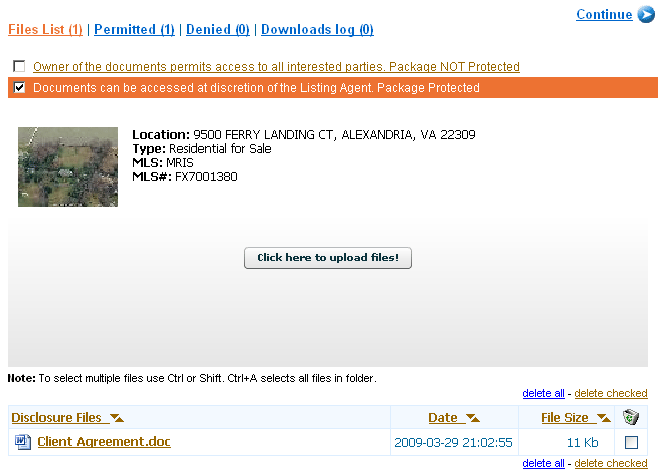
- After clicking the Upload button, you will see a system notice. By default, all your documents are protected. You may also make them public by checking the appropriate checkbox as shown below.
- When some one tries to download a disclosure document and you chose to protect your documents as shown in the example above, your site visitor is forced to leave an email. You will receive a notification email with this visitor's information. If you decide to grant the access, click on the Permit link. You will be directed to login to your Toolkit and you'll see a permission page where you can see the visitor's information. Same directions apply if you deny the document access.
To grant access to the client
- Login to your Toolkit. Click Inventory Manager.
- Look for your listing. Click on Disclosures link under the Action column.
- Click on Permitted link.
- In the drop down menu, chose the client and click Permit. You may also notify your client by clicking the checkbox Notify client.
To deny access to disclosure documents
- Login to your Toolkit.Click Inventory Manager.
- Look for your listing. Click on Disclosures link under the Action column.
- Click on Denied link.
- In the drop down menu, chose the client and click Deny. You may also notify your client by clicking the checkbox Notify client.
To see who downloaded disclosure documents
- Login to your Toolkit.Click Inventory Manager.
- Look for your listing. Click on Disclosures link under the Action column.
- Click on Download Logs link to see who downloaded your documents.


