Auto Activation of Searches
From PropertyMinder WIKI
(Difference between revisions)
| Line 1: | Line 1: | ||
| - | |||
| - | |||
| - | |||
| - | |||
| - | |||
| - | |||
| - | |||
| - | |||
| - | |||
| - | |||
| - | |||
| - | |||
| - | |||
With the AUTO ACTIVATE SEARCH feature is ON, your system will automatically verify and register your prospects using a 3-way confirmation code algorithm. | With the AUTO ACTIVATE SEARCH feature is ON, your system will automatically verify and register your prospects using a 3-way confirmation code algorithm. | ||
Your client has to enter the code received in the email provided to them in the search request. If they have entered an incorrect email address they would not have received the code and thus will not be able to view the search results. Thus the system is programmed to verify the client's email address. | Your client has to enter the code received in the email provided to them in the search request. If they have entered an incorrect email address they would not have received the code and thus will not be able to view the search results. Thus the system is programmed to verify the client's email address. | ||
| + | ===How to enable auto activate searches=== | ||
| - | + | To enable the auto activate searches feature: | |
| - | # Login to your Toolkit | + | # Login to your '''Toolkit''' and go to '''MLS Searches'''. |
| - | + | # On the '''On-line Search Requests''' screen, click the '''MLS Search Settings''' link (you can also refer to the corresponding section of '''Preferences''' page). | |
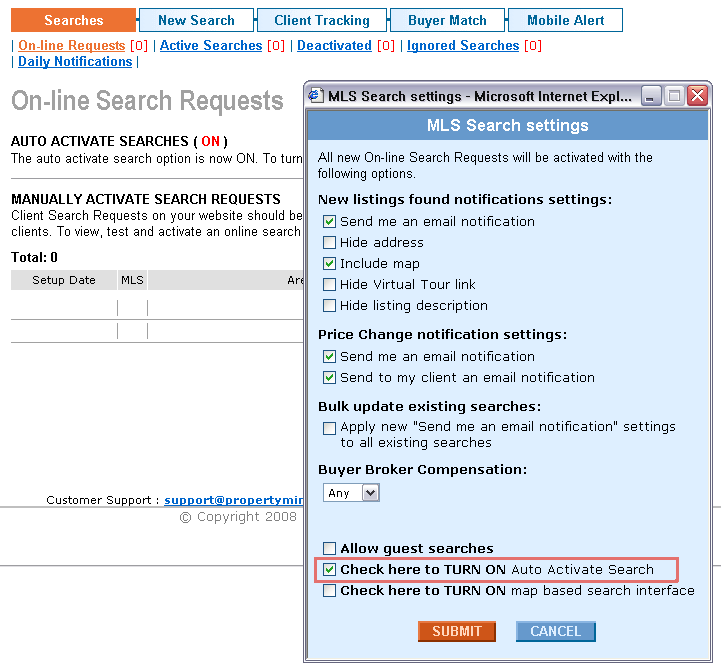
| - | # | + | # Set-up '''Auto Activate Search''' settings, check '''TURN ON''' Auto Activate Search and click '''SUBMIT'''. |
| - | # | + | |
[[File:MLS_searches_1.gif]] | [[File:MLS_searches_1.gif]] | ||
| + | |||
| + | [[File:Ring.gif]] NOTE: Online Search Requests submitted before turning the AUTO ACTIVATE SEARCH feature ON should be reviewed and activated manually. | ||
Revision as of 08:16, 14 June 2011
With the AUTO ACTIVATE SEARCH feature is ON, your system will automatically verify and register your prospects using a 3-way confirmation code algorithm.
Your client has to enter the code received in the email provided to them in the search request. If they have entered an incorrect email address they would not have received the code and thus will not be able to view the search results. Thus the system is programmed to verify the client's email address.
How to enable auto activate searches
To enable the auto activate searches feature:
- Login to your Toolkit and go to MLS Searches.
- On the On-line Search Requests screen, click the MLS Search Settings link (you can also refer to the corresponding section of Preferences page).
- Set-up Auto Activate Search settings, check TURN ON Auto Activate Search and click SUBMIT.
![]() NOTE: Online Search Requests submitted before turning the AUTO ACTIVATE SEARCH feature ON should be reviewed and activated manually.
NOTE: Online Search Requests submitted before turning the AUTO ACTIVATE SEARCH feature ON should be reviewed and activated manually.
