Virtual Tours
From PropertyMinder WIKI
| (8 intermediate revisions not shown) | |||
| Line 1: | Line 1: | ||
| - | + | [[File:Training_Videos.gif|link=http://wiki.propertyminder.com/images/1/1d/Training_Videos.gif]][[Virtual Tour Video Tutorial|Video Tutorial]] | |
| + | |||
PropertyMinder Virtual Tour Studio allows you to create your own virtual tours and slide shows for listings. Even inexpensive digital cameras are capable of creating quality images and moving panoramic presentations. | PropertyMinder Virtual Tour Studio allows you to create your own virtual tours and slide shows for listings. Even inexpensive digital cameras are capable of creating quality images and moving panoramic presentations. | ||
| - | + | Please prepare for creating your slideshow: | |
# Get the best shots with your camera. | # Get the best shots with your camera. | ||
| Line 17: | Line 18: | ||
| - | + | ===To start a new Virtual Tour=== | |
| - | + | # Login to '''Toolkit''' and click '''Virtual Tours'''. | |
| - | + | # In your '''Virtual Tours Studio''' click on '''Create New Tour button'''. | |
| - | # Login to Toolkit and click Virtual Tours. | + | |
| - | # In your Virtual Tours Studio click on Create New Tour button. | + | |
# You can preload the property information by MLS# or add it manually. | # You can preload the property information by MLS# or add it manually. | ||
# Make the necessary changes in the preloaded information. | # Make the necessary changes in the preloaded information. | ||
# Choose a color scheme for your Tour. | # Choose a color scheme for your Tour. | ||
| - | # Click Preview and then Save the listing tour. | + | # Click '''Preview''' and then '''Save''' the listing tour. |
#:[[File:Virtual_tour_studio.jpg]] | #:[[File:Virtual_tour_studio.jpg]] | ||
| - | + | ===To design slides in a new Virtual Tour=== | |
| - | + | ||
| - | + | ||
# Name the slide. | # Name the slide. | ||
| Line 40: | Line 37: | ||
# Add transition effects to the slide and label the photo. | # Add transition effects to the slide and label the photo. | ||
# Write a concise description for this photo. | # Write a concise description for this photo. | ||
| - | # Click Preview and then Save the listing tour. | + | # Click '''Preview''' and then '''Save''' the listing tour. |
# Create as many slides as you need. | # Create as many slides as you need. | ||
| - | # Finally click Finish. | + | # Finally click '''Finish'''. |
The Virtual Tour is now saved as a draft. All aspects of the draft like pictures, transition, labels, listing information etc can be modified as many times as you want, until your clients are satisfied with the presentation. | The Virtual Tour is now saved as a draft. All aspects of the draft like pictures, transition, labels, listing information etc can be modified as many times as you want, until your clients are satisfied with the presentation. | ||
| Line 48: | Line 45: | ||
The draft can be viewed from your Agent Toolkit. A draft is completely editable. To make a Virtual Tour available on the Internet you need to publish it. | The draft can be viewed from your Agent Toolkit. A draft is completely editable. To make a Virtual Tour available on the Internet you need to publish it. | ||
| + | The table below lists the differences between the purpose and functionality of Drafts and Published tours. | ||
| - | + | [[File:Virtual_tour_table.jpg|link=http://wiki.propertyminder.com/images/9/94/Virtual_tour_table.jpg]] | |
| - | |||
| - | |||
| - | + | ===How to publish the Virtual Tour=== | |
| - | + | ||
| - | + | ||
| - | + | ||
| - | + | ||
| - | + | ||
| - | + | ||
| - | + | ||
| - | + | ||
| - | + | ||
| - | + | ||
| - | + | # Select the tour that you want to publish from the '''Drafts''' list. | |
| - | + | # Click the '''Publish''' button. | |
| - | + | ||
| - | # Select the tour that you want to publish from the Drafts list. | + | |
| - | # Click the Publish button. | + | |
# Read the terms and conditions before publishing the tour. | # Read the terms and conditions before publishing the tour. | ||
| - | # Preview the Full and Restricted versions of the virtual tour. | + | # Preview the '''Full''' and '''Restricted''' versions of the virtual tour. |
| - | # Click the Agree to PUBLISH button. | + | # Click the '''Agree''' to PUBLISH button. |
| - | + | ||
| - | + | ||
| - | + | ||
| - | + | ||
| - | + | ||
| - | + | ||
| - | + | ||
| - | + | ||
| - | + | ||
| - | + | ||
| - | + | ||
| - | + | ||
| - | + | ||
| - | + | ||
| - | + | ||
| - | + | ||
| - | + | ||
| - | + | ||
| - | + | ||
| - | + | ||
| - | + | ||
| - | + | ||
| + | In the "Published Tours" screen, click '''Tour Details'''. The Published Tour displays two links: | ||
| - | + | [[File:Virtual_tour_url.jpg|link=http://wiki.propertyminder.com/images/9/96/Virtual_tour_url.jpg]] | |
A full preview brands your virtual tour by including your picture, name, website and contact information. A restricted preview of the virtual tour does not include your contact information and picture. | A full preview brands your virtual tour by including your picture, name, website and contact information. A restricted preview of the virtual tour does not include your contact information and picture. | ||
| Line 114: | Line 76: | ||
| - | + | ===How to add the Virtual Tour to your website=== | |
| - | + | ||
| - | + | ||
| + | # Click on the GET URL link. You will see a new window. | ||
| + | #:[[File:Virtual_tour_url_explorer_u.jpg|link=http://wiki.propertyminder.com/images/b/b0/Virtual_tour_url_explorer_u.jpg]] | ||
| + | # Highlight the link from dialog window, copy it and then add it to the particular listing by going to your Inventory Manager tool and clicking on update listing. You will see a special field for Virtual Tour Link on the listing details page, where you can paste the link to the published Virtual Tour. | ||
| + | #:[[File:Virtual_tour_link.jpg|link=http://wiki.propertyminder.com/images/4/4f/Virtual_tour_link.jpg]] | ||
| + | # You can also add the Virtual Tour link as a new button or link on your website using the Website Editor. | ||
| - | |||
| - | + | ===Hot to advertise the published tour=== | |
* Post it on the MLS. | * Post it on the MLS. | ||
| Line 127: | Line 91: | ||
* Add it to your website. | * Add it to your website. | ||
* Email it to your prospects or colleagues. | * Email it to your prospects or colleagues. | ||
| + | * Add the link to your blog or social media profiles. | ||
Latest revision as of 05:19, 23 June 2011

PropertyMinder Virtual Tour Studio allows you to create your own virtual tours and slide shows for listings. Even inexpensive digital cameras are capable of creating quality images and moving panoramic presentations.
Please prepare for creating your slideshow:
- Get the best shots with your camera.
- Prepare the images and load the pictures on your computer.
You can create 3 types of images for the virtual tour using your Digital camera software:
- Still photos.
- Single photo panorama.
- Panorama 360° web panorama.
Requirements for panorama photos: Any Digital Camera with photo stitching software.
Contents |
To start a new Virtual Tour
- Login to Toolkit and click Virtual Tours.
- In your Virtual Tours Studio click on Create New Tour button.
- You can preload the property information by MLS# or add it manually.
- Make the necessary changes in the preloaded information.
- Choose a color scheme for your Tour.
- Click Preview and then Save the listing tour.

To design slides in a new Virtual Tour
- Name the slide.
 NOTE: The slide name will be the navigation link/button, which your clients will use. Make it short and understandable.
- Upload the photo.
- Select the appropriate radio button to mark the photo as: Still photo, Panorama, or 360° panorama.
- Add transition effects to the slide and label the photo.
- Write a concise description for this photo.
- Click Preview and then Save the listing tour.
- Create as many slides as you need.
- Finally click Finish.
The Virtual Tour is now saved as a draft. All aspects of the draft like pictures, transition, labels, listing information etc can be modified as many times as you want, until your clients are satisfied with the presentation.
The draft can be viewed from your Agent Toolkit. A draft is completely editable. To make a Virtual Tour available on the Internet you need to publish it.
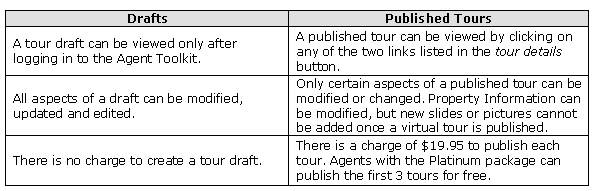
The table below lists the differences between the purpose and functionality of Drafts and Published tours.
How to publish the Virtual Tour
- Select the tour that you want to publish from the Drafts list.
- Click the Publish button.
- Read the terms and conditions before publishing the tour.
- Preview the Full and Restricted versions of the virtual tour.
- Click the Agree to PUBLISH button.
In the "Published Tours" screen, click Tour Details. The Published Tour displays two links:

A full preview brands your virtual tour by including your picture, name, website and contact information. A restricted preview of the virtual tour does not include your contact information and picture.
Most agents will hide Virtual Tours on the listings they send to their clients to block the listing agents information. By adding the restricted view link of the Virtual Tour on the MLS, you can prevent the virtual tour from being blocked, as it does not have your name, photo and contact information.
TOUR DRAFTS
- To view the full preview/restricted preview of the draft, select the draft by clicking it and then click the Full Preview/Restricted Preview button at the bottom of the drafts section.
PUBLISHED TOUR
- To get a full preview/restricted preview link of the published tour, select the published tour by clicking it and then click Tour Details. In the tour details page, click the Get URL link for the Full Virtual Tour/Restricted Virtual Tour and copy the link.
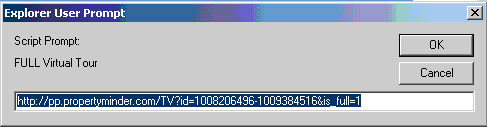
How to add the Virtual Tour to your website
- Click on the GET URL link. You will see a new window.
- Highlight the link from dialog window, copy it and then add it to the particular listing by going to your Inventory Manager tool and clicking on update listing. You will see a special field for Virtual Tour Link on the listing details page, where you can paste the link to the published Virtual Tour.
- You can also add the Virtual Tour link as a new button or link on your website using the Website Editor.

Hot to advertise the published tour
- Post it on the MLS.
- Send it to any online advertising site.
- Add it to your website.
- Email it to your prospects or colleagues.
- Add the link to your blog or social media profiles.